
 Related to Elements: DJ, Crate Digging, 12" Single
All DJs and Crate Diggers know how difficult it is to safely store their records. Record shelves can be a great way to keep the records right at your fingertips, but the ones they sell online can be extremely expensive to buy and ship. Well, put on your DIY hat, adjust your tool belt for your winter waistline, and build it yourself! You’ll save yourself all a whole lot of money that you can wisely spend on records instead. You probably have all the tools you need to do this rusting away somewhere right now.

CLICK HERE FOR 8.5 X 11 INCH PRINTABLE PLANS WITH BLANK VALUES FOR YOUR MEASUREMENTS.
Tools and Supplies Needed:
The Basics:
- Pencil
- Tape measure
- Carpenters’ Square
- Saw (preferably chop saw or circular saw, but a hand saw will work too if you don’t mind sweating)
- Power Drill
- Pilot Hole Drill Bit (recommended, else tiny drill bit will work)
- Heavy Duty Deck Screws 3.5” or longer (preferably self-tapping so they sink in better)
- 2X12” Wood Boards (how many depends on size you want)
Optional: (If incorporating 7 inch shelves)
- 1X7” Wood Boards (how many depends on size you want)
- Narrow gauge screws or small nails or glue
- 1” chisel
Optional: (If incorporating Stack Stoppers)
- 1” Quarter Round corner wood (size depends on how many you want)
- Velcro pieces
Recommended: (For that clean built in look)
- Corner Clamps or a friend (these really come in handy for holding the wood during construction)
- Wood Glue (if using center supports)
- Sander\Sandpaper
- Caulk (to fill in screw holes)
- Paint (your color of choice)
- Felt (cut to size of shelves)
- Sharp Scissors (to cut felt)
- Spray Glue (for adhering felt liner) (I recommend 3M Super 77)
- Rubber Gloves
- Paint Thinner (for cleanup of spray glue)
- Beer (gotta have beer for a project like this)
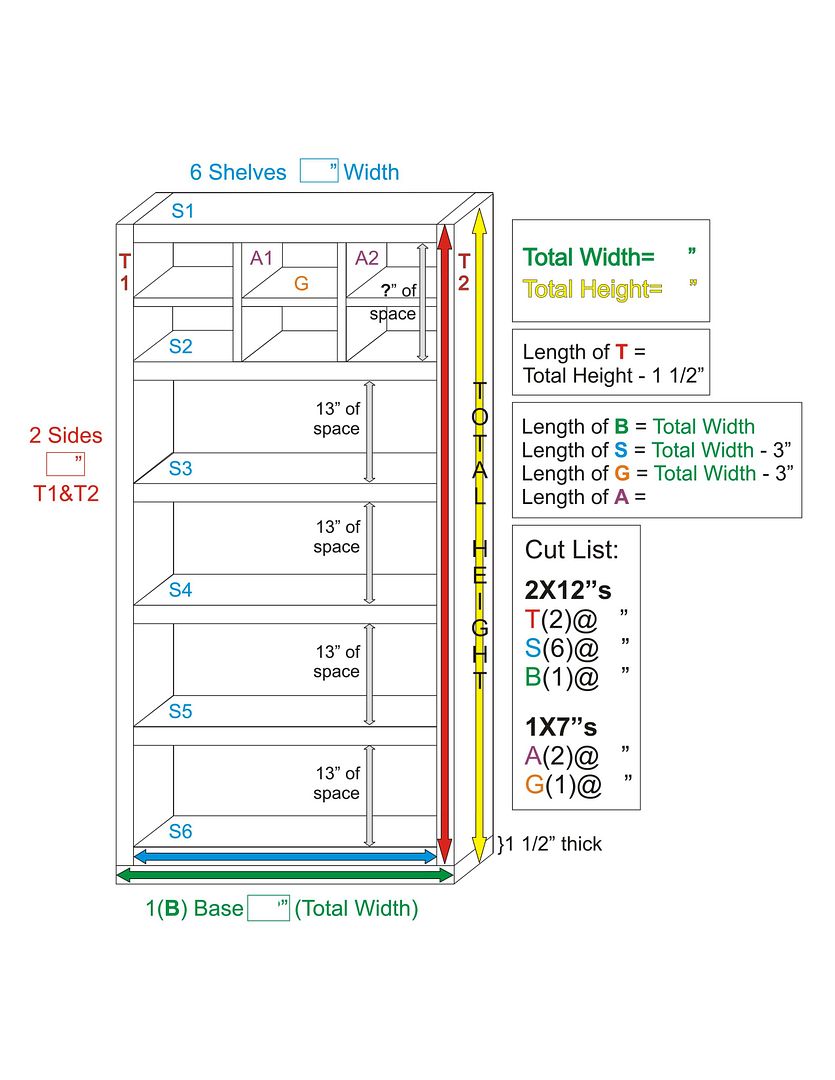
Do the Math
First things first! Determine the size the shelf will take up in your room. Start by measuring the footprint you want it to take up (the total width) and write it down on the printable plans. Next measure the EXACT height from floor to ceiling. Measure twice, cut once! That height will be the total height of the record shelves as it uses the floor and ceiling to prevent it from tipping over and killing you. (But damn! What a way to die, right?) Now, write down the total height on the printable plans. With those two measurements you already have all you need to determine how many pieces of wood need to be cut at what size.
For Fans of Forty Fives
You can go with or without a 7 inch shelf compartment depending on your needs. However, make sure that you allow AT LEAST 16” or more height space in order to have enough room for both levels of 7” records. This depends on your ceiling height. For example, I have a low ceiling of 77” which leaves me the bare minimum amount of space needed to incorporate a 16” tall 45 shelf. If you have 79 inch tall ceiling you can have an 18” tall 45 shelf. The higher your ceiling is, the more room you will have for your 45s.
If you decide to incorporate this 7 inch shelf, do it in the top shelf space. Each standard shelf below it will always have 13 inches of space in between each shelf to accommodate slightly larger record covers or box sets.
Using the total height and total width determined and the formulas provided on the printable plans, complete your “Cut List” so you know exactly how much wood to buy and how long to cut each piece.
(NOTE: 2X12” lumber is extremely strong, which is great because records are extremely heavy. But it will bend in the middle if the shelf itself exceeds a 4 foot wide span, so if you plan on making it wider then that you will need to cut a few 13” support pieces of 2X12” to glue and screw in the center of each shelf span for added strength)

You’ll notice the base of the shelf is the full width of the shelf. This gives the entire shelf greater stability and gets the bottom shelf a bit higher off the floor.
After all of your wood is cut to size, it’s time to start marking the side pieces for easy shelf alignment. On both sides of each side piece (T1 and T2 on the printable plans) using your trusty carpenters square, clearly mark out where each shelf should be, again spacing out each 1 ½” shelf every 13”. (So it should get a mark in this pattern. 1.5, 13, 1.5, 13, until you get to the top shelf which is spaced again more then 13 depending on the height of your ceiling.) Ultimately the span between the top shelf (S2) and (S1) is the only span that will not be 13”.
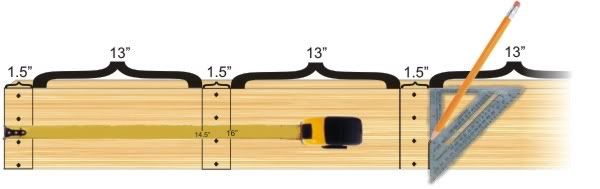 Then with your pencil, mark circles where you want to drill the pilot holes. Space them out a bit, I’d recommend 4-5 screws per shelf side. Start drilling pilot holes. Keep the drill bit plum.
After each hole is drilled, you are ready to start constructing each layer from the bottom up. Corner clamps or friends really come in handy during this phase. So do those 13” support 2X12”s if they are cut perfectly they will hold up each successive shelf for you as you drive the screws in. Drill in each screw until the head sinks into the wood deeply. This will give it the most strength and allow you to putty or caulk over the holes when you are finished building it.
After each piece of 2X12” is in it’s proper position you should have a steady and heavy built-in shelf. Make sure the base is secured and it is snugly compressed by the floor and ceiling. If necessary screw it into the ceiling or floor or wall, make sure this behemoth doesn’t move at all.
At this point, if you want a utilitarian shelf only, without any of the fixin’s, you are done! However, I recommend you go on to the next step if you don’t want it to look unfinished.
Lipstick and Makeup
Caulk or putty the screw holes. Wait until it dries and sand until holes are invisible. Sand all surfaces lightly to get rid of slivers. Clean off with damp cloth, and paint it any color. Depending on how well the paint soaked in you may want to apply a second coat. If you really want to dress it up you can wrap a little trim around the bottom and molding around the ceiling, then it will truly be a built in.
Shelf Liners

This next step I highly recommend because it will prevent wear and tear on your records’ spines from simply sliding the records in and out. Cut pieces of felt to the lengths and widths of each shelf. (Use rubber gloves for this next part) Sparingly spray the back of the felt and the three surfaces of the wood that will touch your records (not the underside of the shelves obviously) with spray glue. Carefully adhere the felt to the shelf surface and quickly remove any wrinkles before the glue dries. It only takes about 30 seconds for the glue to set, so again a friend might come in handy for the longer spans. This is a messy job, you will definitely need paint thinner or mineral spirits to clean up afterward. If you are doing the 7 inch add on, don’t line the top shelf with felt until the next step is complete.
Optional 7 inch compartments
Depending on the span of the distance between S1 and S2 (again you need 16” minimum to proceed) cut your 1X7” pieces to fit using the formulas provided on the printable plans.
 Starting with the vertical supports, (A1 and A2 on the printable plans) use your square and pencil to divide the wood into 4 identically sized quarters. Since the wood is 1” thick you’ll need to cut out an inch wide slot for the intersection of the horizontal run connection it makes. Repeat these same steps with the horizontal shelves. (G on the printable plans) Make sure your measurements are precise on these cuts or it won’t fit properly.
Finally, glue or screw them at their intersection and you have a sturdy little divider that slides right in place. Secure it with wood glue, adhere the remaining felt and it’s complete!
Stack Stoppers?

This will prevent your stacks of records from sliding apart at the bottom. Stick a little Velcro on the bottom of a 12” long quarter round piece of wood and it will stick to the felt bottom perfectly. As your collection grows, you pick it up and move it on down the line.
Done!
Well that is unless you want to build a beer holder for the side, if so you can get the plans for it right here.
UPDATE: 4-6-2011
Money Saving Tip:
For those on a budget, instead of using one long 2X12" piece of wood for the base you could save a few bucks by building the base out of several 2X4" pieces.

Money Saving Tip:
For those on a budget, instead of using one long 2X12" piece of wood for the base you could save a few bucks by building the base out of several 2X4" pieces.
Time Saving Tip:
To save a little bit of time and energy, before cutting any of the wood, paint it or stain it on a saw horse or work bench. It's easier to paint several long pieces of wood on a bench then it is to paint the fully erected shelf. Also, apply the felt before cutting the wood too. It's easier to cut felt in one long strip then multiple sections for each shelf dimension. Then after the wood is painted and felt applied, cut the wood and touch up paint as needed.
Share your progress and pics of the finished shelves:
Mike sent me some pictures of his shelves he built using these plans. Instead of painting them like I did, he bought higher quality wood and stained and added clear coat. As you can see, it looks great.
Thanks, Mike, for sharing these photos!
Thanks, Mike, for sharing these photos!


UPDATE: 2-25-2016
I keep getting great feedback and photos of variations of these record shelving plans. Please keep sending me your pictures of how it turned out, I love seeing them! So thanks for the update Craig! |
| Craig Blackburn Jr's 2 Tier Record Shelf / Console Variation |
Please keep the questions and pictures coming if you have them. Thanks! - rchecka
R Checka! These plans are fantastic, I've been considering building a shelve for some time now, and your How to is fantastic compared to the ones I've seen online! Well done!
ReplyDeleteMike,
ReplyDeleteSend me some pics of your finished shelves, I'll show em here.
rchecka
Done! Your plans are fantastic! THanks rchecka!
ReplyDeleteGlad they worked out for you. Thanks for sending me some pictures of the final product, they look great stained like that!
ReplyDeleteI'll post the pics in an update for this blog post shortly!
Rchecka, you mention that this shelf could fall over. I have high ceilings. Just how tippy is this thing? Any tips on securing it to a wall?
ReplyDeleteIf you make sure the top board (labeled S1) is snug against the ceiling and the base of the shelf (labeled B1) is snug to the floor it shouldn't fall over because it has no space to fall foward. However if you drill straight up thru S1 thru the ceiling with some thick screws as I did that should make it even less likely to fall over.
DeleteIf it is exceptionally large and heavy you could secure it even more by using small metal L-Brackets and secure them to the under side on the far back right up against the wall of one of the high shelves. After it's secured to the shelf itself then secure it to the wall using some drywall anchors or securing it to the wall studs.
Hope that helps!
Finished my shelves and very proud of my workbifci do say so myself. But who knew a 2" x 12"
ReplyDeleteIs not really 2" x12"? My records hang over an inch and I'm neurotically thinking it will damage them somehow. If I had known the measurements were what the salesman at Home Depot "nominal numbers" I would have gone with 2" x 14", which using there logic is probably 1.5" x 12.85" errrr - thanks for the great instructions though and ill just have to hope an inch overhang wont damage my 33 LPs - peace- tommy
Thanks for the feedback Tommy! You are right, a 2x12" is not a true 2 inch by 12 inch board, but a 2x4 isn't two inches by four inches either, nor a 4x4" etc. Many years ago 2x4s were actually 2 inches by 4 inches. I know only because I have some as wall studs in my house which was constructed back in the 1950s. At some point everything changed (probably for the benefit of the lumber companies) and now wood sizes are slightly less then advertised. Either way, trust me, your records overhanging that much will not damage them in the least. I have had my entire collection stored that way for many years now and they have plenty of surface area to keep them flat and true. Plus, the overhang makes them easier to flip through and handle.
DeleteIn fact, I just finished putting up another set of shelves (same wood dimensions) so I'll be doing a part 2 of this blog to elaborate more for the cats like yourself who pay attention to the details. That's much appreciated by the way.
Once again, thanks for the feedback. Feel free to share some pics if you got them. I'm sure everyone reading this would enjoy seeing them!
2x12" is the "wet" dimension of the wood. once it is kiln dried the wood shrinks that much.
DeleteLove these plans thanks so much, I want to build this in my basement before I put flooring in on a concrete floor, what or how do I do the base? Do I need to frame a base for it or how des that work I'm a little unclear on that part. From concrete floor to ceiling right now I'm at 82 inches and the total width of the wall space is 164 inches what are my options ?
ReplyDeleteThanks for your feedback. The base you can do 2 ways, and I would use treated lumber for your base with either way since it will be sitting directly on porous concrete and regular wood would rot in no time. But with a nice green treated base the moisture will not effect it at all.
DeleteI've build a few of these shelves in my basement. The quick and easy way is to just use 1 2x12" green treated piece of lumber cut to the width of the shelf. Make sure it's very flat and heavy. Then start building from there by putting the non treated 2x12" pieces directly on top of that. So your base will be basically (2) 2x12" pieces, a treated on the bottom and non treated directly on top of that as shown in the plans. Screw them together for a very heavy very solid base. From there you build up.
OR the cheaper way, uses less wood but requires more cuts...
Still use treated wood on the floor, but cut 2X4"s as shown in the pic above entitled "Budget base". It doesn't really save you much money, only a few bucks so I don't know if it's much of a budget. But it works just as good, as long as the 2x4 pieces are nice and flat and cut perfectly to the size of your shelf.
Since you know the floor to ceiling is 82 inches, I would make that your set height of the shelf so the ceiling is one contact point and the floor another contact point making it tip proof. Plug those numbers into the blank shelf plans above and you'll have a very solid shelf. To take full advantage of the space I would also use the full width as the width of the shelf. But measure carefully when doing this because when it is that tight, it won't move but if it's too long or too tall it won't fit. Obviously it's better to cut long and cut twice than to cut too short but I'm sure you already knew that.
I hope that helps, please feel free to ask any other questions at any time if I missed something,
Thanks,
Joe (rchecka)
Thank you so much, so the treated lumber on the floor should it be screwed or nailed to concrete or just float so to speak. Also them running the width of the shelves should the base treated lumber be right up against the floor/wall corner or out a few inches?
ReplyDeleteI wouldn't screw it or nail it into the concrete just because that will invite more moisture up through the ground. It will be so tight and heavy that it would be overkill. I screwed the highest horizontal piece to the ceiling though and that added just a bit more stability and that wouldn't cause an issue.
DeleteI would also run both pieces of the base the full width (no more, no less) of the shelf. I did with mine and then I used a piece of regular trim around the base to cover up the green treat leaving just a dime thickness of space between the trim and the floor so the trim hides the green treat but doesn't touch the floor. That'll look really nice if you do that as well, find trim that suits you.
Good luck and please show me pics once it's done!
Would it be possible to make a version of this that doesnt reach all the way up to the ceiling? I'd like to make one that's three shelves high and about 10 feet wide. Could i just use some L brackets to affix the shelf to the wall studs for added stability?
ReplyDeleteI've seen a few variations of these plans where they didn't reach the ceiling. They all used either L Brackets or metal wire to support it to the wall. So as long as you have a nice level solid base L brackets would be a good way to go. Thanks for asking!
DeleteDid you actually read the article?
DeleteHow many record does each in hold ? Thanks
ReplyDeleteThe plans allow for you to make it narrow or wide so it'll hold as many as you want it to hold if you build it big enough. I have one that holds a thousand plus or so and another that holds only a few hundred. You can fit about 70 per foot so depending on how long each tier is should give you a rough estimate of how many it can hold.
DeleteHi rchecka,
ReplyDeleteThese look great! I've been wanting to build my own record shelves, and they seem the way to go. I have two questions though:
1. I have molding at the baseboard, so I can't put shelves flush to the wall. Do you think I need to anchor them to the wall because of that, and if so, how do I bridge the gap? I've got three bookcases doing the job right now, and they've never wobbled or anything, but I'd like to be safe. If it matters, I plan to make the shelves eight feet tall instead of six (large collection and a nice high ceiling).
2. You recommend supports for shelves wider than four feet, but there are none in the plans, where the shelves are 57". Do they tend to not bow even at that length?
Many thanks,
Jeremy
Built some of my own using your plans as the base. Wrapped it around a corner and added some crown and base. Still have to hide the gap between the back and the wall caused by the base on the walls. But looks great.
ReplyDelete[URL=http://s1053.photobucket.com/user/zbarbera/media/Records_zpsquu24rik.jpg.html][IMG]http://i1053.photobucket.com/albums/s471/zbarbera/Records_zpsquu24rik.jpg[/IMG][/URL]
Sounds cool! I'd love to see the picture but the link doesn't work. Maybe try posting it at imgur.com since Photobucket is flaky.
DeleteThis comment has been removed by the author.
DeleteNope. Ok. try again with imgur. Luckily have an account, already. So, the long shelves are ~45 inches and the short ones ~24. Didn't add supports on the long shelves since they stayed under the 4' rule. Hopefully they don't bow. If they start I'll add some supports.
Deletehttp://i.imgur.com/bUjQBC3.jpg
This comment has been removed by the author.
DeleteThis comment has been removed by the author.
DeleteThanks!
ReplyDelete1. If possible remove the molding from the section your shelf will be on. Cut the molding at a 45 so it can marry with molding that surrounds the shelf. If it's not possible to remove the molding you can put the same molding around the base of the shelf and angle it in so it looks married with the wall molding. Then you can use a small piece of vertical trim that compliments it to cover the gap. That's what I did and it really looks nice.
2. I didn't put them in the plans because they can go wherever you need them. They are the same boards as the shelf only cut to 13 inch height. You can stagger them as I did on one of my shelves for a cool effect as well. The 2x12 will start to bow in time if you test their strength with long stretches of records without that extra support. I haven't tested it in time but I can tell you that my very full 10 year old shelves haven't bowed even a tiny bit when I have supports every 4 feet. It also seems to help the records from flopping all over those long lengths which you don't want.
Hope that answers your questions. Thanks for asking.
Official Periodic - The Periodic Table Of Hip Hop Elements Blog: Diy - Simple Record Shelves Plans >>>>> Download Now
ReplyDelete>>>>> Download Full
Official Periodic - The Periodic Table Of Hip Hop Elements Blog: Diy - Simple Record Shelves Plans >>>>> Download LINK
>>>>> Download Now
Official Periodic - The Periodic Table Of Hip Hop Elements Blog: Diy - Simple Record Shelves Plans >>>>> Download Full
>>>>> Download LINK