Friday, November 22, 2013

My Horrible Records Time Capsule, Subtitled: Crapsule

 
Cuing up "That Smell" by Lynryd Skynyrd

Related to Elements: Crate Digging, DJ, Underground

Every evening as I descended the basement stairs on my way to my nightly music-listening ritual in the man cave, I'd be forced to ask myself "What is that God-forsaken, moldy-ass smell?  ...And why are the stairs squishy feeling?"  I knew the answer already, but I was afraid to look and find out.  I ignored it until the smell became unbearably strong and it was obvious at that point it was time to act for the health and safety of my family.  

So after a little liquid bravery on a quiet Saturday morning it was time to bust out the power tools and demo some basement walls!  After a little sweat and a lot of noise I found a hidden crawlspace right next to the basement steps where the smell was emulating from.  

IT WAS ABSOLUTELY NASTY!  As soon as I removed the paneling hiding the hell hole, the smell rushed out of there and grabbed my nose hairs.  Thankfully my family was gone for the weekend and luckily I had a dust mask to help at least keep some of that death out of my lungs.

Well now I did it.  I just created a huge job for myself, but it was one that couldn't be avoided any longer.  I knew looking at the hole what I had to do.  It was time to man up and seal this place up properly.  But only AFTER dealing with the mold that came courtesy of the dumbassery of the previous owner of my house.  I've watched enough Holmes on Homes on TV to know it needed to be "done right the first time or not at all!"

Don't worry, I'm not going to go through the entire child birth process, I'll skip right to the baby.


Removed the nasty, poured concrete, sealed with Dry Lok Paint, insulated properly!

Long story short, after a lot of work the smell was finally gone!  Now I can seal this up properly and I'll know there will be no problems with moisture or moldy insulation again.

Water Tight, Air Tight, Sealed Space = Time Capsule


Before I seal this small crawlspace up behind walls for "eternity", I knew I had one chance to leave behind a permanent message for future archeologists or pissed off home-owners.  Something that I can leave behind that represents my lifestyle as a human being.  After pondering a while on the dilema with a few beers it hit me, "Duhhhhhh, RECORDS!!!"

Records Last Forever!  Well, they do if stored and\or played properly, and this was now the perfect sealed-off from the elements environment.  But there's no way in hell I'm going to leave behind any of my cherrished records!   Even some of my crappy records can still be sold for cash, so I couldn't just throw in random crap that some people would enjoy.

I had to choose the most horrible records I had.  Stuff I'd have a hard time selling even if I wanted to.  I had to choose records that were horrible quality pressings or massively overproduced or just terrible music.  So I chose 3 records that represented all of those qualities and gifted it to the future inhabitants of my little corner of Earth.


Time Crapsule: The List!  My 3 Worst Records Left Behind in No Particular Order


Relax!  It's the Mexican Pressing

1.  Devo ‎– Freedom Of Choice "Libertad De Eleccion" LP (Warner Bros. Records) Mexican Pressing 1981

Look, I LOVE Devo.  It pained me to even THINK about dissing Devo in any way.  But this pressing was not their fault and if anything it probably pissed them off more than it did me.  I actually bought this record earlier this year from an online seller.  It was never the best album they did but it was a Devo album I didn't yet have on wax, still sealed for only 6 dollars!  What could go wrong with that deal!?!  Well, I guess I didn't pay attention to the "Mexican Pressing" footnote on the product listing.  

 
"I'm on a Mexican, (woah woah) Radio!"


"What's so bad about a Mexican pressing?" you may ask.  After all, they invented the world's only perfect food, the taco, so how could they possibly screw up something as simple as pressing a record?  Well apparently they didn't have the speed setting right at the pressing plant that day because this record sounds like the Chipmunks doing Devo.  No lie, this thing somehow plays too fast at 33 RPM.  

But hey, no problem, I have a deck with pitch control, so I'll just slide it way down and then it will sound normal right?  Well it helps a little, but screw that!  Any time you have to use your pitch control to make ANY record sound right you are literally bending over and taking it from the record companies.  Even with the pitch adjusted the entire thing sounds hollow and without any nuances.  This is probably one of the worst cases of quality control I've ever seen\heard in all my years of collecting records.  

So Naturally I couldn't sell this to anyone in good conscious knowing the look on their faces would be similar to the look on my face when the needle was dropped on it for the first time.  I can't pass on crap to others, that's the opposite of paying it forward.  Besides, Devo deserves more respect than that.  So I whipped it into the hell hole!  (sorry, bad pun!)


$12 from 720 records, this was unofficial as all hell, a DJ Shadow boot to boot

2.  DJ Shadow ‎– March Of Death / Karmacoma 12" BOOTLEG (Mo Wax) 2005

I love DJ Shadow's music and I love Zach De La Rocha's music so the thought of hearing a collaboration between them was WAY to intriguing for me to pass up when I saw this back in 2005.  I'll admit, I knew it was a boot when I bought it, but there was no other way to get that music back then, and, as it is often the case, curiosity killed the cat.  

This sounds like pure ass.  It sounds like it was recorded from telephone and then pressed to record.  There is almost ZERO bass, it is muffled, it doesn't even begin to sound good at any point.  Even with my EQ highly tweeked it was not enjoyable to play on either side.  

As with all bootlegs, the artists on here didn't make a penny off this sale.   Shadow himself mentioned it's existence on his website and obviously if it was legit it would have gone through quality control until it sounded great...


Like it does here...

The Real Deal.  Buy THIS if you want to actually enjoy that song.

Once I bought the Handmade record, there was no way I was going to keep that bootleg around, and I couldn't justify passing the buck onto a fellow Shadow fan even if he or she knew what they were buying.  They deserve better and the musicians deserve better.  It was clear that this boot deserves permanent dark days in the hole.  


3. Natalie Imbruglia ‎– Smoke (Remixes) 12" Promo (RCA) 1998


Horrendous music doesn't even begin to describe this
Why in the name of all that is unholy do I even have this?!  I don't even REMOTELY LIKE Natalie Imbruglia so why is this vile record touching my other records?  It's not that she's a bad musician, (well yeah, she's pretty horrific or maybe average sounding on her best days) it's that this is an overproduced sounding remix clusterfuck.  The remixers didn't even attempt to use her vocal track in a respectful way, in a way that accentuated her vocals, or even left the vocals alone.  These songs were all about over-effect-processing trippy-trance sounding beats and basically they were trying to make it get played at some upcoming rave.  

I think I bought this on year one of my record collecting days, when I was an utter newb.  I clearly didn't play it before I bought it or I would have left it in the store.  I'm pretty sure I bought it because I liked some of Rae and Christians productions at the time.  Yet even that remix, the only remix I bought it for, sounds abominable.   There is literally nothing about this collection of corny, predictable-build filled, and utterly outdated sounding remixes that sounds even remotely tolerable.  

I attempted to sell it a few times and I got blank stares from the record store owners I showed it to.  The last guy I brought it to said "Dude, I have like 5 of those online right now for a buck, so even if you want to donate it to me, I don't want it."  I swore that would be the last time I took it home feeling embarrassed and defeated, so into the hell hole it goes with the rest of the heinous archaic black discs!


A Warning for the Future


And now the message.  Time to write something that will be my legacy, something awe inspiring...  I could leave a written http link to this blog, but blogs are too temporary and who knows if the Intenet won't be directly responsible for Skynet in the future.   

Hmmmm....


Ah hah!!!


Sometimes I just can't leave well enough alone


Cuing up Taps


It's the moment of truth!  Now it's time to permanently seal the horrible record time capsule.  

2" pink foam was cut to size, but not too tight yet leaving room for expansion foam to cement it firmly into place.

Closing the coffin lid on wack records
 
Lastly I sealed off the capsule forever with Great Stuff expansion foam.
 
Using expansion foam around all 4 sides for an airtight, watertight seal


That's all folks!  Nothing more to see here!
The expansion foam has now cured, the cavity is officially sealed off forever.  Now I'll cover it up with drywall and hopefully the next guy won't see it until I'm dead and buried.  

And on the day I die, I can do so with a small sense of fulfillment knowing this little piece of history was left behind for future generations to hopefully enjoy hating as much as I did.


Wednesday, August 28, 2013

Speaking of Crate Digging, What About The Crates?

 
Stacks of milk crates
What crates stack up the best for record storage and transporting collections?

Related to Elements: Crate Digging, DJ

Long before Showbiz & AG rapped about "Diggin' in the Crates" on their 1991 Soul Clap EP, or even before "Diamond done looked in the crate and found you this FUNKY beat!" on Raheem's 1989 track "I'm The King", DJs and vinyl collectors have been digging through actual real milk crates for their records.  In fact, crates have been used for decades longer than the term Crate Digging was even muttered in any song, because of their once abundant availability and convenient size they were the most practical container for transporting and storing records.  Milk crates can come in countless shapes, sizes, styles and colors and to this day they are manufactured specifically for storing things just like your records.  Some are much more practical than others for the job.  While some are easier to carry, they might be bad on record edges when diggers carelessly flip through them.  Yet others were seemingly designed for storing 12" wax because they cradle the records safely under the rim making them easy to stack without damaging the top spines.


K-Def Crates
K-Def knows crates.

Random Milk Crates
Crate Break Down: Your typical crates, the classic brown, classic orange, and bad blue Sterilite.


For over 15 years, Wade Schilling, Owner of Metrowax Records has accumulated a mass amount of all kinds of interesting crates in his various acquisitions of DJ collections.  He has been kind enough to let me run rampant in his huge warehouse allowing me to snap photos of the more interesting ones that not a lot of people see hanging around any more.  He's got the good, the bad, and the ugly crates too.  It's clear they just don't make crates like they used to, in fact so many of these are now basically antiques.


Crates are rarely ever discussed by crate diggers, they ironically seem iconic and mundane at the same time.  Everyone who has them seems to overlook them, they neglect them or kick them out of the way, or maybe they step on them to reach a higher shelf.    Antique or not, no one really knows their true dollar value, nor does it matter, but we all visually associate them with what we truly love, our vinyl collections.  When you see a milk crate, you don't think about milk, you think about records! 

Digging in the Crates
Classic Orange vs Big Grey


So which ones work best? Which ones are the worst for storage and digging? It depends. It's basically a personal preference based on how you use them. Are you a DJ who only cares about the music, wants something lightweight and easy to handle who maybe doesn't care if the covers are damaged? Are you an audiophile who keeps the record covers in pristine condition and puts outer protective plastic sleeves on his or her best wax? All of these are factors in deciding which ones get filled with your beloved records.  


The Classic Orange Crate:


orange milk crate
The smaller classic orange crates force angled storage of records
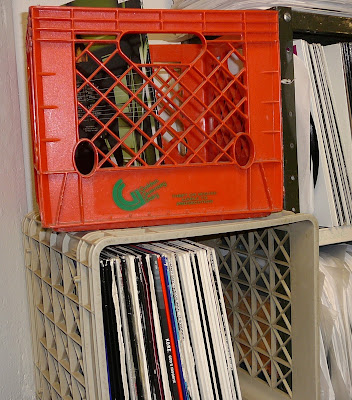
It could be orange or brown or any color.  It's whatever color the milk company felt like repping that year.  At Metrowax most of them are orange with the big green "G" for Golden Guernsey Dairy.  But regardless of color, they are all that slightly-too-small-for-twelves size.  

Personally, I like my 12" records to fit perfectly in the crate.  These classic orange crates are not wide enough for that.  However, when packed just full enough (not too full, or too loose) the records don't flop back and forth and for transporting small collections they are adequate and fairly rugged and light weight.  But they are not stackable when full of 12"s and if you don't have the right number of records in them the records tend to bend and flop back and forth which can be hard on the edges and the records if you aren't careful.  


Classic Orange Rating:

Strength: 9/10
Weight: 9/10
Record Wear: 5/10
Ease of Handling: 8/10
Amount of Records Held: 5/10
Overall Rating: 7/10 (Average)


The Big Grey Crate:

grey milk crate
A mad villain named DOOM stares from the iconic "X"s in big grey crate
Records easily fit in Big Grey.  They stay well below the rim making them easy to stack while full.  They are tough and fairly lightweight but not as easy to handle as the classic orange.  The hand holds are fairly sharp and when loaded are a bit rough on the hands.  The edges inside the crate, like many crates, are fairly sharp and with repeat record flipping they will wear on the record jackets' spines and sides.  Like most crates, potential wear and tear can be minimized when it's lined with either congregated cardboard or carpet on the bottom, or if you really want to be anal you can line the front back and sides with cardboard as well.  


Like the grey crate, this white one has sharp handles.  Fixed with grip tape!
Big Grey Rating:
Strength: 9/10
Weight: 8/10
Record Wear: 7/10
Ease of Handling: 7/10
Amount of Records Held: 9/10
Overall Rating: 8/10 (Above Average)


The Big Orange Crate:

orange milk crate
Unlike the classic orange, this generic orange crate is full sized
I bought this crate from Wade months ago because it was one of my favorite crates ever,  and it really adds a nice touch of color to my studio.  It currently holds all my odd-ball novelty crate digging beat-source records, library records and sound effects.  Records easily fit in Big Orange as well.  Records are taller than the crate so once it's full it cannot be stacked.  They are extremely tough with almost none of the typical crate holes which are much easier on the records when flipping through them.  Their handles are a bit sharp and might hurt the hands when fully loaded but they are still one of the most practical crates for protecting, moving and storing records.  When a 12X12" carpet square sits at the bottom of big orange, it cushions your records and keeps them from sliding forward, and with that small addition, this crate is as good as it gets.


crate with carpet
Like the classic orange, without padding, the bottom is not ideal for record wear and tear


Big Orange Rating:
Strength: 9/10
Weight: 7/10
Record Wear: 9/10
Ease of Handling: 7/10
Amount of Records Held: 9/10
Overall Rating: 8/10 (Above Average)


The Big Red Crate:

red milk crate
Big red, the best crate to store my scratch tools
The same day I bought big orange, I bought this crate from Metrowax as well.   It seems to be much older and tougher then big orange, and it has the throwback milk logo going for it, but other then that it's basically the same type of crate except slightly taller. 


sealtest milk crate
A vintage French-Canadian Milk Crate


Big Red Rating:
Strength: 9/10
Weight: 7/10
Record Wear: 9/10
Ease of Handling: 7/10
Amount of Records Held: 9/10
Overall Rating: 8/10 (Above Average)


The Bad Blue Crate:

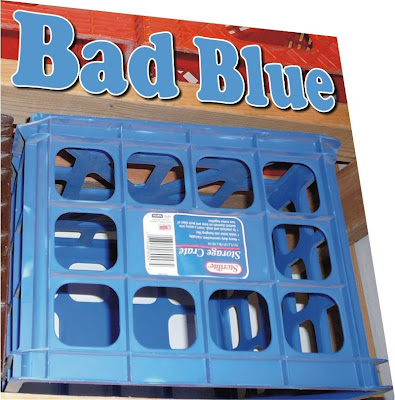
blue crate
Notice there is no records in that?  There's a good reason for that.  Bad blue is called that because quite frankly it's lousy and basically a worthless waste of space.  It's a fairly modern, cheaply manufactured crate for random home storage use by Sterilite.  This never had anything to do with milk, and it shows.  Metrowax probably got this from some DJ who bought it from K-Mart back in the day.  It's very lightweight and therefore very breakable.  Every single edge protruding from inside and outside of this crate is sharp.  Incidentally It destroys record's covers with even a few flips through them.  Even half loaded with records, picking it up leaves sharp painful pressure marks on your hands.  You can find a very similar modern day equivelent of Bad Blue in many department stores and I would strongly recommend that you never buy it for storing your records unless you don't care about cosmetic damage to your covers.

Bad Blue Rating:
Strength: 5/10
Weight: 8/10
Record Wear: 4/10
Ease of Handling: 3/10
Amount of Records Held: 8/10
Overall Rating: 5/10 (Poor)


The Sharp Yellow Crate:

yellow crate
"OOOM, BOW BOW...  CHICK!  CHICKA, CHICKAAAHHH!"
Like bad blue, this is manufactured for general home storage for people's crap.  Except this one is even weaker, lighter, and sharper edged and so it chips easily.  Carrying it even empty pains the hands.  This one is so bad it seems to have attracted some kind of brownish mold growth on it.  It normally doesn't even store even Metrowax's unsellable records but since I found the perfect 12" for the picture I couldn't resist the setup of the photo.  As soon as Wade saw me fill it with records he made damn sure I emptied it immediately after photographing it.   "I don't even know why that crate is in here" he muttered.

Sharp Yellow Rating:
Strength: 4/10
Weight: 8/10
Record Wear: 3/10
Ease of Handling: 2/10
Amount of Records Held: 8/10
Overall Rating: 5/10 (Very Poor)


The Wide Load Crate:


wide crate
Embassy Dairy's wide load crate, not bad for CDs
This vintage milk crate is fairly odd, it's much wider than the standard square crate.  Not thick enough to put 12" records in it the long way, and too wide to put them in the short way.  You could place a few twelves in it and slide in a few 7"s on the side of it to keep them from sliding around, or better yet, you could use it the way Wade does as storage for random 45s and CDs.  Basically, when loaded, It's too cumbersome to be practical. It's better as an "odds and ends" storage container.


wide crate
Not bad for 45s either!
These two are from "Embassy Dairy" with the tag-line "A Protein Group Company" based out of Waldorf Maryland.  Want to call them and see if they have any more crates?   All you gotta do is zoom in to the phone number on the picture of the crate and see if they are still kicking it in 2013.

Wide Load Rating:
Strength: 8/10
Weight: 6/10
Record Wear: 5/10
Ease of Handling: 2/10
Amount of Records Held: 8/10
Overall Rating: 5/10 (Poor) 


The Steel Crate:

metal crate
This solid steel constructed crate with a plastic bottom crate is a pain
Just like the classic orange crate, the records don't fit in straight.  They need to be angled to fit in at all.  But at least the classic orange completely destroy your covers like this does with flipping of records.  Sure, it's strong, but it's heavy as hell and loaded with sharp edges.  There's about 30 dollars worth of scrap metal here that's basically what it's good for.

Steel Wire Rating:
Strength: 10/10
Weight: 2/10
Record Wear: 4/10
Ease of Handling: 4/10
Amount of Records Held: 5/10
Overall Rating: 5/10 (Very Poor)


The Wooden Crate (Fruit Crate): 

wooden crate
Stezo chilling in the wooden crate.

Sure it holds a lot of records, but try lifting it.


No brand names on this, so we're not sure if it's a real fruit crate or just handmade and sized the same.  It's got a cool factor, although it's pretty long it's hard to carry and even pick up.  The wood is fairly smooth, but it's still not the best on records edges for flipping through them.  As long as you have to store records you won't be moving for a long period of time this is fine, but I wouldn't even attempt to use it to carry my records from DJ gig to gig.


Wooden Crate Rating:
Strength: 7/10
Weight: 2/10
Record Wear: 6/10
Ease of Handling: 3/10
Amount of Records Held: 10/10
Overall Rating: 5/10 (Poor)


The Plastic Tub:

plastic tub for records
Another cheap Sterilite product

Not a crate technically, but in this case it was purchased to store records.  I guess "Sterilite" is death to covers because this one is just as shoddy as it's other cheap container the bad blue crate.  The sides are smooth, but the records sit on cheap plastic that cracks under no pressure at all.  Wade told me this broke immediately after filling it half way.  


The record edges were somehow stronger than the clear plastic, so it broke through damaging the record and the tub.  Carpet was added to try to get by but even that didn't help the integrity of the tub.  Out of all storage crates this tub is probably the absolute worst option.  Too big to be practical and too week to be filled.  Use this to store record magazines, NOT your records.  There are some tubs that are just fine for storing records but this isn't one of them.


By putting plush carpet in the bottom of these tubs that made it so they weren't completely  useless wastes of space, but even with carpet in them to protect the records, once filled you shouldn't even think of lifting it or the entire bottom will break right off leaving you a pile of damaged records on the floor.

Plastic Tub Rating:
Strength: 1/10
Weight: 8/10
Record Wear: 3/10
Ease of Handling: 3/10
Amount of Records Held: 8/10
Overall Rating: 4/10 (Worst) 


The Record Flight Case (Odyssey) 

DJ Travel Case Records
Bulletproof but heavy.
Another "Not a crate" crate, but this had to be included here because I'm pretty sure this thing literally is bulletproof.  Designed to be sealed closed and even locked for the traveling DJs of the world.  It's made with a heavy duty metal shell with a softer inner padding.  The padding could be improved since when it's not full records can flop back and forth easier, I usually just add a small piece of styrofoam in the front when I'm on the road so if they do fall they fall against that and not the metal lip.  Designed to hold 80 records comfortably its about as heavy as you'd want it to be.  Any bigger and it would be too heavy to carry with the one handed handle at the top.  The really nice thing about this is it protects your records on all sides including from sun damage and subsequent warping from hot days.  Rain and snow proof too! 


Lockable and Weather Proof.


Nowadays I keep all my Sesame Street and non-Sesame Street kids records in here as it's the perfect size for that small niche collection.
 
Odyssey Flight Case Rating:
Strength:
10/10
Weight: 7/10
Record Wear: 8/10
Ease of Handling: 8/10
Amount of Records Held: 8/10
Overall Rating: 8/10 (Best)


Summary:

To cap it all off, it's apparent that there are many varieties of crates out there.  So many we've never seen nor will we ever see since many of them are basically regionally produced milk crates.  They each have their own strengths, weaknesses, and quirks.  In real life scenarios many of the modern retail store sold crates just aren't cut out to hold your records.  Frankly quite a few of the old milk crates aren't much better on your record's covers and spines if misused. 

Crate digging as we know it will always be about the records and never about the crates, but the crates themselves will always be the unheralded symbol of our ongoing quest for our personal best, yet-to-be-discovered records.   


ADD ON!  GOT A GREAT CRATE NOT SHOWN HERE?

Submit it to us here, by posting a picture link in your comment.  If anti-spam settings won't allow you to post a picture link, post a written comment only and I'll make sure it get's shared here.  You can always join up and PM me at our forum the Cratedigging Cooperative or else you can find my email here


RELATED READING:  A Crate Digging Breakdown

NEED MORE RECORD STORAGE?  DIY Record Shelves Plans

Thursday, March 21, 2013

DIY QRD Diffusers for Home Studios: My Home Studio Renovation Project Pt. 1


The Centerpiece of my man cave, just above my beer fridge is my DIY QRD Diffuser.

Related to Elements: Crate Digging, DJ, Producer

You've seen these before, those "Skyline" or "Cityscape" diffusers gracing the walls of high end production studios.  Technically known as QRD Diffusers, besides looking really cool (well, they look better than empty egg crates) you may have wondered what they are actually intended for.  There's all kinds of scientific explanations with audio-nerdaphyle jargin out there.  If you really want to know what's going on with the sound waves when they hit these things, feel free to peruse this website's breakdown...  As you can see they even have a program that when room values are plugged into it you can really get into custom sizes.  I truly believe these things work as advertised but finding a professionally built one online at a reasonable price is never gonna happen.  Besides you don't need an engineering degree, or special software, as long as you have the tools and time you can just adjust your tool belts for your winter waistline and build one yourself! 

I'm not even gonna try to reinvent the wheel with this blog post.  I don't need to since these plans are already out there online and credit should be placed where credit is due.  Here are the plans I followed for the one I built and it is well written, simple to follow, and best of all IT REALLY WORKS! 

I can however, enhance these plans with a little how-to tips I learned along the way, perhaps this blog post might dispel some of your self-doubt if you are afraid to tackle this fairly simple DIY.

Tools Needed:

  • Plans
  • Pencil
  • Black Permanent Marker
  • Carpenters Square
  • Chop Saw or Mitre Saw (the sharper the blade the better, I wouldn't even attempt with hand saws, that would take forever so, a powered saw is a must)
  • Strong Wood Glue (I recommend Elmers' Wood Glue Max since it's strong, paintable and stainable)
  • Thin Plywood (1/8" thick) to mount it on (approx 18" X 18") (a 24 X 24 piece will leave plenty of extra)
  • 6 or 7 8 foot long (2X2) pieces (the primary wood)
  • Course Drywall Screws to hang it. (at least 2" long)
  • Heavy Duty Construction adhesive (like wood glue only stronger)
  • Optional Stain or Paint and appropriate brushes and drop cloth

Make sure you really eye up your wood before you buy it.  Inspect it well, choose super straight (not bent or warped) pieces or you will never get the pieces to stand up right.  If you make perfect cuts with no mistakes you can get away with buying 6 eight foot pieces of 2X2 but I would buy 7 if I were you, there is little room for error with only 6 pieces.  As far as wood types go, you can buy cheap old pine but I wanted something heavier, more solid and when stained I wanted the wood grain to really pop, so I chose solid oak.  At around 20 dollars per each piece this was not cheap so if you are on a tighter budget pine is much cheaper.

Stain or Paint First


One thing I did differently than those plans recommended was I stained the pieces before I cut them.  It is much easier to stain (or paint) several 8 foot long 2X2s vs. cutting them and handling them all one by one.  Not to mention gravity would work against you and you'd have dark spots or paint clots where all the joints of each individual piece of wood touched if you did the staining after the assembly.  It took 3 coats of stain on each side of the wood, so as you can imagine doing it any other way would take way too long.  


Stain First, cut later!  Angle the wood on a 45 so you can do 2 sides at a time.

Find a cool safe place to stain the long pieces.  I recommend water based stain since it doesn't stink up the whole house and is a cinch to clean up!  To kill 2 birds with one stone I cut a V notch into the top of a leftover piece of wood which held the pieces in a 45 degree angle so I could stain 2 sides at a time for each piece.   Three coats gave it the high gloss look I wanted, stain less coats for lower gloss looks.  Stain, then wait till those sides dry, rotate 180 degrees, then stain that side, wait, rotate again, stain again until you are satisfied that it looks good.


Use Jigs for Easy Identical Sized Cuts

Don't measure every piece, make perfectly sized jigs
The plans call for 4 different lengths of various sized pieces and I know for sure if I measured every single one and then cut them I would have 50 different lengths.  So using cheap scrap wood I measured exactly each size, labeled it with the sharpie, and nailed a flat leftover piece of wood with an overhang to the end of it.  By doing that I can place the long piece, put my jig right on top of the piece I am cutting and it will butt up against the end tightly.  Holding the jig in place you can lower the blade right up against the jig edge and as long as you hold it tight and don't cut your jig you will get a perfect cut.  It goes without saying that your chop saw should be locked in at 90 degrees before cutting.  The sharper the blade, the cleaner the cut will be.

Butt the blade against the jig then cut perfect lengths.


Store the cut pieces in a container after they are cut and prep for edge staining

After cutting all the pieces you need, clean them all off with a rag or shop vac and prepare to stain the best cut edge facing you.  The best cut side of each piece should be up if you want to see no blade marks or nicks.


All the pieces ready for the final coat of stain with the best edges up
Now the fun part... (not really)  Staining the ends of 144 pieces, for me 3 more times.  The trick is to put on some kind of music cause this is really boring without something playing.  Have a dry rag handy to wipe the excess drips that run down the sides that are already stained.  Stain is runny, so seriously, have a dry rag nearby if you don't want black stain runs down each piece.  Paint isn't as bad but the same dripping will occur with paint if you aren't perfect (which you are not).

Once you are done staining and it has dried, line up 12 of the pieces (any size length) side by side and measure the length of all these 12 pieces tightly placed in a row.  It should be right around 18" since the original pieces are not true 2X2s.   Keep in mind it won't be exactly 18" because the stain or paint made each piece a little thicker.  You can cut the backer of your diffuser to this to the exact width of the 12 pieces or you can make it a bigger square to make it easier to hang as I did.  I cut my 1/8" piece of plywood the exact same size as the piece of drywall that it was to cover so it was much easier to hang in that location and it covered the drywall completely therefore making it look like the diffuser was glued right to the drywall with no backer at all.  This is up to you whether or not you want it invisible looking or something with an obvious edge, you could even frame that edge if it bothered you with small pieces of trim.  

Once you cut your backer square piece to approx 18X18" or larger, print out your diffuser layout for easy assembly of the pieces.


Before you start gluing any pieces, paint your backer piece the desired color of paint and make sure it is bone dry.  Then find the center of the backer with the old draw an "X" trick.  I found the center of my backer plywood piece drawing an "X" using a straight edge and penciling from corner to corner.  I then drew 2 center lines on the the elevation layout to split it into quarters... 

...like this.


Split diagram into 4 equal quarters and start crossing off as you glue.
I drew the same quadrants on the backer plywood piece using the carpenter square so the center intersection was exactly dead center of the "X".  Draw these lines darker than the X, if you follow these straight lines closely you will not gradually go off course even without drawing a full grid.  Starting in the upper left of the lower right quadrant, glue the pieces one by one where they belong and cross off each piece you glue as to not loose your spot.  Make sure you spread the glue on the entire surface of the bottom of each piece, and have a dry rag handy to wipe off any excess glue that pushes out when you press the pieces down.  Keep gluing and keep crossing off each number on the layout as you proceed.  It is VERY important that you stay exactly on the edge of the line on this first row because all other pieces in the quadrant butt up against that row.  If you get the first row wrong, it will get harder each row and eventually you will be way off.  Take your time gluing and be a perfectionist with the first row and then it will start to go very quickly.  Repeat for the remaining 3 quadrants keeping the first row perfect with each one.  Gradually as you glue each piece the diffuser will start to come together.  Since I used heavy oak, I glued the sides of every few pieces that touched each other for extra sticking power.  It may have been unnecessary, but I didn't want any of the pieces falling on my beer fridge so I played it safe with every few pieces getting a little extra side glue.  

Now the hard part...Wait at LEAST 24 hours before moving it, leave it alone on a flat surface so the plywood doesn't bend and it dries perfectly flat.


Glue and Screw the backer securely to the wall and make sure you hit studs!

For this next part you will want the help of a strong friend.  Mark the wall and draw a perfectly level line where you want the piece to live.  Find the wooden or metal wall studs by knocking the drywall listening for them or use a stud finder.  If there are no studs where you want it, then you should reconsider moving it to where studs are, or at least get some heavy duty drywall anchors that grab the back of the drywall.  I wouldn't trust them though, because this thing is VERY heavy so try to find a spot with 2 studs one on each side.  If you use construction adhesive along with screws don't plan on taking this with you when you move, it will never come off with that stuff.  I used construction adhesive and screws, so I guess if the next person who buys my home doesn't like records they are gonna have to learn to live with it.

Once this is securely in it's new home, drive the screws just beneath the surface of the backer wood and caulk or putty the screw holes to hide them.  Once that filler dries paint it the same color as the wall and it will look like it's "floating" on the wall.

Now, sit back, bust out a cold brew, drop a needle on your favorite record and you'll notice how much sweeter the music sounds.  I swear by it, this truly does work.  I could tell immediately that slap-back bass echos no longer plagued my space.  After I coughed up all that money for wood and glue, I was quite satisfied with the results.  In the end it became a nice looking functional unique sculpture piece for literally hundreds of dollars less than what I could have bought online.

Fully diffused.


Stay tuned!  Part 2, which is some more in-depth DIY man-cave plans is coming soon.

Also check out the Youtube Video Walk through of my finished Studio for a 360 degree view.


For DIY Records Shelves Plans see our most popular DIY Simple Record Shelves Blog Post


For before, during, and after pics of the studio and further information check out the thread post at Cratedigging.co and by all means, please join us